
Updated: January 24, 2024
So, you’ve splurged on hardwood floors. They’re beautiful, they add that timeless touch, and they should last you a lifetime—if they’re installed right. But here’s the kicker: according to the National Wood Flooring Association (NWFA), many flooring failures are due to poor installation. Yeah, you read that right. So, how do you tell if your floor’s got a shaky foundation? How do you spot those warning signs before they snowball into a full-blown disaster?
That’s where we come in. We are Weles, a licensed hardwood flooring company, with over 7 years experience in the industry. Buckle up—by the end of this, you’ll know exactly how to spot hardwood floors installation mistakes and what to do about them. Trust me, you’ll be the one calling the shots, not the floor. You'll easily find signs of bad hardwood floor installation.
I. Understanding the Basics of Hardwood Flooring
Before we get into what goes wrong, let’s take a step back and understand the essentials. What are the variables at play when it comes to hardwood? Here’s a breakdown:
-
1. Types of Hardwood Floors
- Solid Hardwood Flooring
Made from a single piece of timber. Beautiful. Durable. Classic. But, man, this stuff is sensitive. It swells and shrinks with the seasons. Too much moisture? Buckling. Too dry? Cracking. These floors require attention and proper installation in the right “atmosphere”.
- Engineered Hardwood Flooring
Think of engineered hardwood as a sandwich—layers of wood compressed together, with a top layer of real hardwood. This layered structure makes it more stable in areas with fluctuating humidity, but don’t get too cocky. Engineered hardwood usually can’t be sanded as many times as solid hardwood, so you’re limited on maintenance. However, such a floor will still last you for decades.
- Prefinished vs. Site-finished
Prefinished hardwood floors come with the finish already applied. Perfect, right? Faster, cleaner, and with consistent quality. Site-finished floors, on the other hand, let you customize—but only if done right. Bad sanding? Uneven finish? That’s a one-way ticket to trouble.
- Solid Hardwood Flooring
-
2. Key Performance Factors
- Moisture Sensitivity
Wood loves to absorb moisture, but it doesn’t always love what it does to its shape. If the humidity goes up, your planks will expand. If it drops, they’ll shrink. Keeping things stable in the room is key to preventing big issues down the road.
- Acclimation Requirements
You wouldn’t move into a house without adjusting to the climate, right? Neither should your wood. Before installation, hardwood should acclimate to the room’s temperature and humidity. Keep it in the space where it’ll be installed for 3-7 days. If it doesn’t adjust first, it’ll adjust later... and it might not be pretty.
- Subfloor Conditions
Your subfloor is the unsung hero. A clean, level, dry subfloor is the foundation of a solid hardwood floor installation. Mess this up, and you’ll be dealing with squeaky floors, warped boards, and everything in between.
- Moisture Sensitivity
-
3. Recommended Standards
- Official Guidelines
The NWFA has very specific standards for installation, moisture content, and finishing. It’s not rocket science, but it’s close enough to ensure your floor will last. Stick to these standards, and you’ll thank yourself later. Learn more.
- Moisture Content Ranges
Ideally, hardwood should have moisture content between 6% and 9%. Your subfloor should fall within 2-4% of that. If your subfloor is reading 8%, your wood should be between 6%-10%. Too high or too low? You’ll start seeing problems soon.
- Official Guidelines
II. Pre-Installation Red Flags
Before you even touch that first plank, keep an eye out for these red flags associated with bad hardwood floor installation. These early missteps could turn your dream hardwood floor into a nightmare.
1. Material Quality Check
-
Visual Inspection
Look closely at each plank. Are there major knots, deep cracks, or warped edges? Minor defects are part of the charm of natural wood, but these shouldn’t be so obvious that they’ll become a problem when installed.
-
Moisture Meter Reading
It’s your best friend before installation. Let's say it again, stick your moisture meter in the planks. They should be between 6%-9% moisture content. Anything more or less than that could result in the wood shrinking or warping once it’s in place.
2. Subfloor Preparation
-
Leveling & Cleaning
A clean, level subfloor is non-negotiable. Remove dirt, dust, and debris, then check for dips or high spots using a straightedge or level. Anything that’s off? Fix it with leveling compound. No exceptions.
-
Dryness Checks
Use that moisture meter again on your subfloor. Anything over 12% moisture, and you’ve got a problem. If your subfloor is too moist, it could cause warping or mold growth. Get that moisture in check.
Subfloor Readiness Checklist
| Item | Action Required | Pass/Fail |
|---|---|---|
| Debris Removal | Vacuum & mop as needed | |
| Levelness | Use leveling compound | |
| Subfloor Moisture <12% | Check with meter | |
| Secure Subfloor Panels | Nail down loose spots | |
| Gaps or Cracks in Subfloor | Fill or repair |
(Fill out the table before installation. Any “Fail” item must be fixed first.)
3. Acclimation Process
-
Recommended Time Frames
Don’t skip the acclimation. Your planks need at least 3-7 days to adjust to the temperature and humidity of the room they’ll be installed in. Skip this step, and you’re gambling with the floor’s stability.
Most manufacturers suggest placing hardwood planks in the installation area for at least 3 to 7 days. This allows the wood to adjust to the room’s normal temperature and humidity.
-
Ideal Conditions
Keep the room between 60–80°F (15–27°C) and humidity between 30%-50%. Outside this range, and the wood will start misbehaving. These ranges are commonly recommended by the National Wood Flooring Association (NWFA).
Approximate Humidity Ranges for Optimal Acclimation
| Humidity % | Notes |
|---|---|
| 30–50% | Most stable |
| >50% | Potential for swelling |
| <30% | Risk of gaps, splitting |
III. The Installation Phase: Best Practices

This is the part where most people go wrong. But it doesn’t have to be that way if you know the proper steps.
- Laying Out the Planks
- Direction & Stagger: The planks need to run perpendicular to the floor joists for maximum stability. And don’t just stack them up next to each other. Stagger seams by at least 6 inches to avoid weak spots and create a pleasing visual pattern. Think of it like a puzzle—just with bigger pieces.
- Expansion Gaps
- Why They Matter: Wood expands and contracts with humidity shifts. Without the proper gaps—about ¼-inch around walls and doorways—your floor will buckle. And that’s the last thing you want.
- Where to Check: Gaps near thresholds, skirting boards, and around stationary objects are your goal. Do not think that if they are not visible, they will cause problems. Pay attention to them.
- Fastening Techniques
- Nailing, Stapling, or Gluing: There are a few options here: nails, staples, and glue. Use the right method for your floor.
- Common Mistakes: Too few fasteners, and your floor will squeak. Too many, and you’ll risk damaging the wood. Know when to stop.
- Finishing Steps
- Prefinished vs. Site-Finished: Prefinished boards save time, while a site-finished floors allows for custom floor painting, but requires skilled shipping and sealing.
- Sanding Guidelines: If you’re doing a site-finish, you’ve got some sanding to do. Follow the proper progression: 36 → 60 → 80 → 100 grit. This will give your floor that smooth, professional sheen without visible sanding marks. Don’t rush this step. Ever.
By aligning planks effectively, leaving proper expansion gaps, choosing the right fastening method, and finishing with care, you can avoid many future headaches and ensure a hardwood floor installation that stands the test of time.
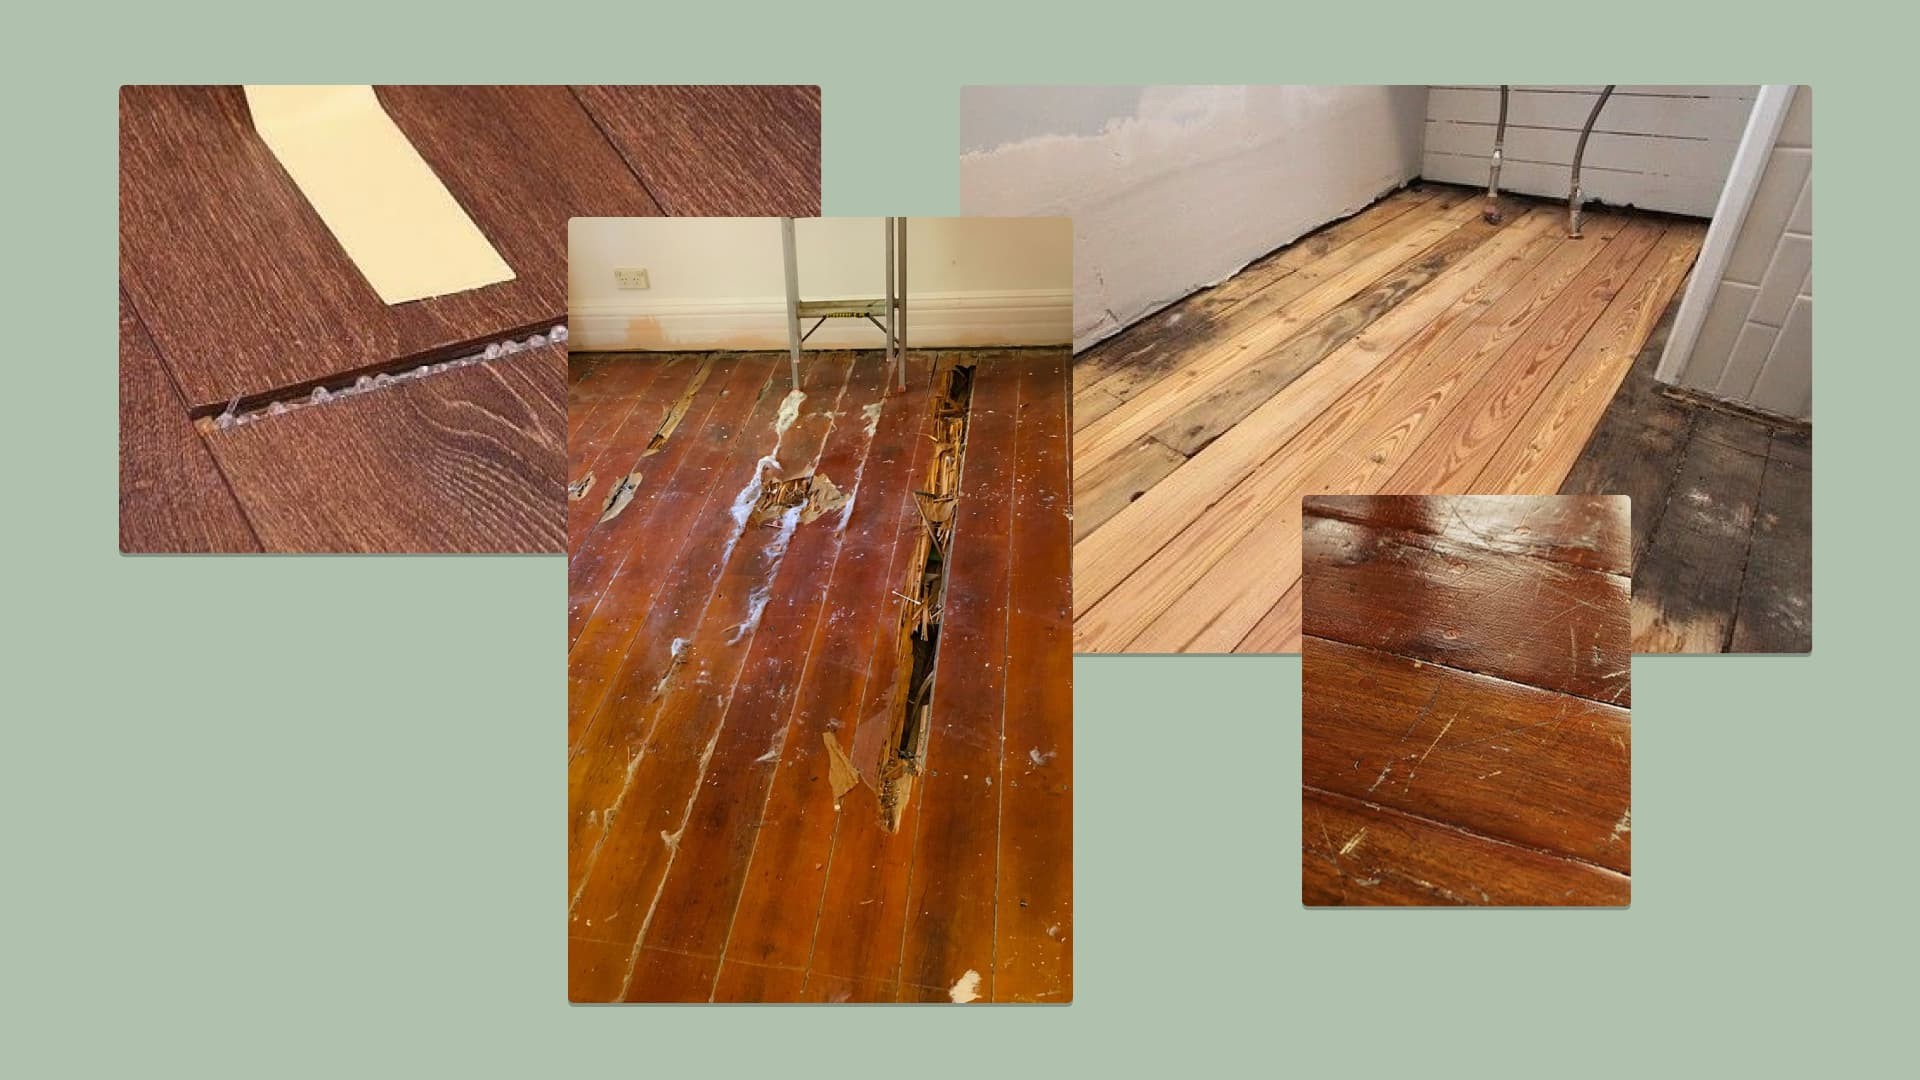
IV. Detecting Signs of Bad Hardwood Floor Installation

Identifying early signs of poor hardwood floor installation can save you from costly repairs or replacements. Here's what to watch out for and how to fix it.
1. Excessive Gaps & Spaces
-
Cause: Wood is a living material that needs time to acclimatize. Skip this step, and your boards may shrivel up like a wool sweater in a hot dryer. Without adapting to the humidity and temperature of the room, gaps will form in the hardwood floors.
-
Why It’s Bad: The gaps will attract debris and moisture, turning your chic parquet into a carnival of chaos, contributing to their faster wear.
-
Fix: Minor gaps? Seal them with wood filler and fix the loose boards as if the reputation of your flooring depends on it (because it is). More serious problems? This means that replacement or dehumidifiers are required. Read more in our article on how to fix gaps in a hardwood floors.
💡 Pro Tip: Got a moisture meter? Use it like a floor detective. If your wood’s moisture content isn’t room-ready, you’re asking for trouble.
2. Buckling, Warping, or Cupping
-
Cause: Water. Too much of it, and your floor rebels. High humidity, leaky pipes, or a subfloor masquerading as a sponge? Recipe for disaster. Expansion gaps missing? It’s like locking a claustrophobic person in a closet—your floor needs room to breathe, or it’ll fight back with warps and buckles. Cupping? Uneven moisture exposure plays favorites, and your boards end up looking like a sad wave pool.
-
Why It’s Bad: Tripping hazards. Cosmetic Issues. Structural vulnerabilities that scream, “Replace me!” Ignore it, and your floor’s days are numbered.
-
Fix: First, find the leak—whether it’s a pipe, poor ventilation, or your climate’s cruel joke. Fix that, then replace the damaged planks. Once the storm clears, maintain humidity like your flooring’s life depends on it (spoiler: it does).
💡 Pro Tip: Room humidity should live happily between 35-55%. Keep it there, and your floor will thank you for years.
3. Creaks and Squeaks
-
Cause: It’s loose nails. Or maybe an uneven subfloor. Or possibly boards rubbing against each other, creating a symphony of irritation every time you take a step. Incomplete fastening is usually the smoking gun, causing tiny shifts and, yep, squeaks.
-
Why It’s Bad: Noise pollution aside, squeaks point to instability. And instability? That’s the gateway drug to bigger, pricier problems down the road.
-
Fix: Squeak repair kits are your new best friend. Secure loose areas with screws, but don’t go overboard—this isn’t a DIY disaster movie. Widespread noise? You may need to re-nail or re-staple the whole floor.
💡 Pro Tip: Silence is golden. Address squeaks early while they’re just whispers. Once they turn into a chorus, you’re in deep.
4. Uneven or Poor Finish
-
Cause: Maybe someone got overzealous with the sander or chose a finish that wasn’t up to snuff. Could be improper staining. Or worse—a rushed job where shortcuts turned into long-term regrets.
-
Why It’s Bad: Uneven finishes do more than just assault your aesthetic sensibilities. They leave the wood vulnerable to moisture, dirt, and premature wear, ruining both looks and longevity.
-
Fix: Spot-sand and reapply the finish if the issue’s contained. If the whole floor looks like a sad Picasso experiment, brace yourself for a full re-sanding and re-coating.
💡 Pro Tip: Invest in high-quality finishes made for hardwood floors. This isn’t where you cut corners—unless you want to re-sand sooner than you’d planned.
5. Misaligned or Crooked Planks
- Cause: Poor planning, lazy measurements, or an installer who thought eyeballing it was good enough. Misaligned planks aren’t just an eyesore; they mess with the structural integrity of the floor.
- Why It’s Bad: It’s more than just cosmetic issue. Misalignment weakens the floor over time, leading to uneven wear and potential failure. And it doesn’t just feel wrong—it is wrong.
- Fix: For small misalignments, pull up and realign the offending planks. If the issue’s widespread? You might have to redo a significant portion, or the whole thing.
V. Post-Installation Checks and Long-Term Maintenance
So, let's assume that everything is fine with your hardwood floors. We have solved all the problems or we have not found them. But what to do next? How to avoid new problems with wooden floors, how to maintain their quality and beauty?
Step 1: Tactile & Sound Assessments
- #Important
- #Maintenance
- #Inspection
First, you should make it a habit to conduct regular tactile and sound checks:
- Walking Barefoot: Just walk barefoot on your floors. Make it a habit. Any bumps and dips in your feet will be noticed immediately. Problems with the base of the floor, poorly laid board shifted, gaps, etc.
- Listening for Squeaks: Do you hear creaking when walking? Small squeaks that are becoming more significant are a signal for big problems.
Step 2: Monitoring Seasonal Humidity
- #Important
- #Humidity
- #Climate
Wood is capricious to the microclimate, as we have already said many times. If you make it a habit to monitor the indoor climate and maintain it, it will greatly improve the lives of your hardwood floors.
- Using a Hygrometer: The hygrometer is your loyal ally. We remind you once again: humidity in the range of 35-55% is what you should strive for.
- Dealing with Climate Shifts: The changing of the seasons is a test for your wooden floors. Use a humidifier for dry winter air and a dehumidifier for humid summer air.
💡 Pro Tip: Consider installing a whole-house humidifier or dehumidifier. It’s the “set it and forget it” solution for hardwood longevity.
Step 3: Regular Cleaning & Refinishing Intervals
- #Important
- #Cleaning
- #Refinishing
Cleaning and periodically refinishing hardwood floors is what your floors need:
- Cleaning: No need to use abrasive cleaners and regular buckets of water! There are special cleaners for wood with a neutral pH level - a gentle and effective tool for parquet. Dust daily, vacuum weekly (with a soft brush!). Try not to wet or scratch the surface of the floors.
- Refinishing: Treat your floor with sealant and/or refinish it again every 3-5 years. Believe me, this is not just a matter of aesthetics, but also a matter of the existence of your floors and their durability.
💡 Pro Tip: Don’t wait for visible damage. Re-coating a high-traffic area before it deteriorates saves time, money, and your floor’s integrity.
VI. Troubleshooting and Professional Help
Let’s get real: some problems are too big for DIY fixes. Your hammer and a squeak repair kit can only take you so far. When do you call in the cavalry? When moisture’s wreaked havoc, when gaps gape like canyon fissures, or when warping turns your flat floor into a roller coaster.
Deciding When to Repair vs. Replace
If it’s a handful of gaps, a quick patch job might suffice. But if you’re dealing with water damage, a misaligned subfloor, or boards so warped they’d make a surfer proud, replacement might be the smarter call.
Questions to Ask a Pro
You’re hiring someone to rescue your floor—make sure they know what they’re doing. Ask about moisture testing, subfloor preparation, and how they’ll tackle your specific issue. These aren’t polite queries; they’re essential interrogations.
VII. Real-World Examples or Case Study
Let’s talk about John. He installed a new hardwood floor himself in family living room, dreaming of cozy evenings on his polished planks. But dreams turned to nightmares within weeks—gaps, warps, and an unsettling pop with every step.
What Went Wrong?
Upon inspection, it was clear that the installation had several key issues:
- Skipping Acclimation: The wood went straight from the supplier to the floor. No adjustment period, no chance to acclimate. Disaster ensued.
- Improper Nailing: John missed several correct nail installation locations. Due to insufficient fastening, the boards wobbled like loose teeth.
- Moisture Issues: The subfloor hadn’t been moisture-checked, and guess what? It was damp.
How It Was Fixed:
A certified hardwood company assessed and identified the damage. The boards were removed and replaced in high traffic areas, and the remaining boards were properly secured. A moisture-proof layer was applied to the base of the floor. Just a couple of days of work and the floors were shining.
Cost and Repair Timeline:
The repair cost John about $1,500. This includes dismantling, installation, and moisture treatment. The project took 2 days.
IX. Frequently Asked Questions (FAQ)
Moisture is the enemy. Bathrooms, basements, laundry rooms—skip hardwood there, unless you are ready to maintain and install the right hardwood floors. For a more detailed look at where you should or shouldn’t install hardwood, check out our full guide here.
Yes, and no. Floors settle, and a few noises are fine. But if they’re squeaking like an ungreased door hinge weeks later, you’ve got an issue. Loose nails or a wobbly subfloor might be to blame.
Give it 1-2 weeks for the floor to adjust to its new home. If the settling turns into shifting or the planks look like they’re on the move, you’ve got deeper issues to tackle.
Only if you prepare. In humid or dry climates, controlling indoor conditions is non-negotiable. Without it, you’re setting your floor up for failure. For a more detailed look, read our full article on installation restrictions here.
Conclusion / Final Thoughts
Key Takeaways
Your hardwood floor is more than just a surface, it's a central detail of your home. Treat him with the care and attention he requires, and he will reward you with decades of beauty. Ignore the warning signs, and you'll doom yourself to frustration and big repair bills. Regular inspections, attentive service, and knowing when to contact professionals are all part of the plan. Don't skimp.
Next Steps
Next, we recommend that you study our blog for additional materials on the topic of hardwood floors. We also provide a simple checklist in PDF format with which you can record the signs of bad hardwood floor installation.
Questions or Feedback?
If you want us to review your floor case or clarify anything in this guide, send us a note.
Email: weles.usa@gmail.com